Yesterday I hit a wall of frustration. Between preparing for the first day at school and re-working my relief sculpture example I was swimming with ideas and floundering on what to do next. My list of things to do was choking my ability to focus on any one of them. So I took a break and went to my dear friend and fellow teacher's house for a coffee break and some guidance. Funny thing is all he did was listen and I talked through my own plan of action.
In the process of talking through the priorities it became clearer to me how I should approach the pace of the 3D class I'm designing. Starting with a relief portrait sculpture made from layers of cardboard and then going to a sculpture in the round using collage on a manikin head is both overkill and not enough experimentation to fully grasp the concepts of relief and color symbolism.
Question: How will I give the students the fully understand the characteristics and qualities of relief sculpture, continue to find ways to express their personal identity teach the sculptural methods included in the state standards for art?
Answer: Continue the concept of relief sculpture but change it up a bit. 1st project = assemblage (additive technique) 2nd project - modeling, subtractive sculpture and maybe even casting. Instead of adding layers to build height, students will subtract from a slab. Then use plaster to make a cast of that carving. Continuing to emphasize the relationship between positive and negative space with the carving and casting will reinforce those elements introduced in the first portrait relief project.
Through brainstorming how to go about developing this lesson concept I found myself looking back through the lessons I had book marked. THere had to be something out there for me to build on.
Dick Blick showcases a lesson on their site called Bas Relief Painting. Their lesson is my starting point. The lesson offers different ways to connect the process with history, architecture, and ancient cultures. Greek and Roman architecture with marble relief sculptures, Native American Totem carvings and paintings, West African Mahogany carvings and masks, Mesopotamian sand sculptures and Egyptian limestone temple carvings are the examples given by Dick Blick. This lesson also uses Wonder Cut linoleum blocks that are mostly used for printing.
Question: This is a 3D class, not a 2D class so how can I build on that lesson?
Answer: Recycle the old red and white clay left over from last year to create thick slabs for students to carve. Then cast the completed carved slabs in plaster. Why these materials? It's what we have available that doesn't require me to buy additional supplies. (The budget was cut to bare bones) Because we will cast the slab, it doesn't matter if the clay is "properly" wedged because it won't be fired. Students can focus on their carving which will be the "positive" space of the final artwork. Red and white clay can be combined to create enough clay for the class of 25. The pieces will be small enough to use acrylic paint or stains to bring color into the sculpture. A clear coat of modge podge or acrylic sealer can be added to the survace to lock in color and keep moister out. Keeping with the theme of identity the prompt for this project could be a person, place, or thing that has shaped who we think we are.
Well, I'm off to plan that more.
Tuesday, September 6, 2011
Monday, September 5, 2011
Reviewing Lessons in Sculpture and WebQuests
In my quest to develop a curriculum based around the enduring idea of identity I have been surfing the web for sculpture projects that would spring forth new ideas. One site with a plethora of great art lesson plans is http://www.incredibleart.org/ Here are some of my favorites.
- Styrofoam Sculpture
- Ceramic Relief Sculpture
- Color Symbolism and Culture
- Subtractive Plaster Sculpture
- Metamorphic Self Portrait -
- Plastic Tape Figure Casts
Each of these deals with the human form in some way. The color symbolism page is not really a lesson plan but a definition page of what colors can symbolize in art. This one led me to further inquiry about the meanings of different colors. Which in turn led me to want to develop a web quest for my students for find the colors they would use for their relief portrait sculpture. So with a little bit more inquiry I found a web site that shows how to do just that.
WebQuest Design Map lays out a formula for creating a web quest. There are links here that lead to template designs that can be used in an HTML editor.
The student page is the template that the students would see and use for the WebQuest assignment.
I continued to explore and found that with all the WebQuest designing sites I had to know html or needed some sort of html editing program like dreamweaver to edit the templates for my own use. Well, I don't know how or have the software. After some frustration I realized that I could just follow their designs, with my own content and links in a work document and link it to my school web site for my students to use. So that's what I'll do.
Saturday, September 3, 2011
Reflections on Processes
Well I have survived in-service week with a feeling of success and apprehension. Success in that the workshop (in-service training for the county art teachers) went well. Apprehension in that I'm not sure I'm ready for the students on Tuesday. Working on getting my classrooms and plans ready, my independent study for grad school, coaching field hockey and running the kids around to their orientations left me exhausted and stressed by the end of the week. So to De-stress I decided to do some art. Well, art in that I continued working on my samples for my 3D Design 1st student project. After I had spray painted the relief face yellow the paint started to peel from the card board. So wait for it to dry, scrape off and go at it with green. I wasn't getting the result I wanted so I decided to test out adding tissue paper to join the different levels. Didn't work. So then I stepped back looked at it. Well it was Supposed to be a portrait of my daughter. It looked like a really old version of her. Maybe it needed more height to bring out the cheeks and not be so flat. Added a few more layers, painted them. Still not happy. I had been working outside because of the spray paint. It was getting dark so I put it away for the night and I'll go back to it today.
Even though I was not so happy with the way the artwork was going the process of working on it calmed my brain enough that thoughts of how to continue to build my lessons began to flow through my head. I had originally thought that I would steer my students toward using one color of paint for their surface treatment. In the style of Louise Nevelson, they would build with multiple boards and use color to unify the entire work. Well.... Students will be using all boards to build their relief sculpture, not various materials. So in essence their work is unified my the building material and using only one color isn't so nearness for unification. While I still want to discuss and have students investigate the symbolic meaning of color with this project, the use of multiple colors may actually enhance their artwork. The variety in color may actually express more about their personality than a single color. But how to do it is now the question. I think I will revisit the tissue paper idea, but also experiment with paint too. The only problem with paint is that because of having 25 students in the class, tempra paint or spray paint is my only option. Acrylic and oil are out because of the amount that would be needed and the cost of the paint is too much for my budget. Maybe I need to start by spray painting the entire sculpture with white. This may make the colors more vibrant than painting directly on the brown card board.
 |
| Needs work, still looks like old lady |
 |
| Seems too flat still in the face |
 |
| Edges of the relief |
Even though I was not so happy with the way the artwork was going the process of working on it calmed my brain enough that thoughts of how to continue to build my lessons began to flow through my head. I had originally thought that I would steer my students toward using one color of paint for their surface treatment. In the style of Louise Nevelson, they would build with multiple boards and use color to unify the entire work. Well.... Students will be using all boards to build their relief sculpture, not various materials. So in essence their work is unified my the building material and using only one color isn't so nearness for unification. While I still want to discuss and have students investigate the symbolic meaning of color with this project, the use of multiple colors may actually enhance their artwork. The variety in color may actually express more about their personality than a single color. But how to do it is now the question. I think I will revisit the tissue paper idea, but also experiment with paint too. The only problem with paint is that because of having 25 students in the class, tempra paint or spray paint is my only option. Acrylic and oil are out because of the amount that would be needed and the cost of the paint is too much for my budget. Maybe I need to start by spray painting the entire sculpture with white. This may make the colors more vibrant than painting directly on the brown card board.
Wednesday, August 31, 2011
Sharing Ideas at the PCPS Inservice Training
Every year during the pre-school week our county has one day of county wide in-service training. Usually the art teachers are placed in some boring, non applicable, session with other core teachers. Not often do we have a specifically "Art" related training. This year I called the assistant superintendent for instruction and offered to lead a session for the art teachers. One of the best parts is that because I am a teacher in the system they wouldn't have to pay me. Just give me re certification points. This was a big selling point as the county really has NO money.
I presented 2 options for training.
Option 1 - Lesson / Technique Exchange
- 2 Groups (k-6) and (7-17) Each Art teacher brings in their favorite lesson/project or media technique to demo and share. Notify teacher prior to work week for them to bring in 1 paper copy of the lesson or instructions and to bring necessary supplies for demo and practice. Lessons/Instructions are to be photocopied during session so everyone has a copy of the lesson to take back to their school.
Option 2 - Printmaking and image transfer techniques and projects
- For this session I will demonstrate how to do a variety of image transfer techniques and how to incorporate them in to larger art projects. I will also demonstrate different printmaking techniques with a focus color mixing and value variations that can be done without a printing press.
Process
1. Drop a hand full of rubber bands on to the paper. Draw the negative space created by the overlapping bands and their shaddows.
2. Demo how to use the wet erase markers
3. trace the pencil lines drawn with the markers and use water to spread the color and add design.
4. The negative space now becomes the positive space.
Applications:
1. Exploring positive/negative space, line designs, abstraction,
2. Exploration in making something complex from something simple
3. Exploring the power of chance in the creation of art.
I presented 2 options for training.
- 2 Groups (k-6) and (7-17) Each Art teacher brings in their favorite lesson/project or media technique to demo and share. Notify teacher prior to work week for them to bring in 1 paper copy of the lesson or instructions and to bring necessary supplies for demo and practice. Lessons/Instructions are to be photocopied during session so everyone has a copy of the lesson to take back to their school.
Option 2 - Printmaking and image transfer techniques and projects
- For this session I will demonstrate how to do a variety of image transfer techniques and how to incorporate them in to larger art projects. I will also demonstrate different printmaking techniques with a focus color mixing and value variations that can be done without a printing press.
About 4 days prior to pre-school week she notified me that she would like me to do both options with all the art teachers together. So out went the email to the art teachers to bring in a lesson and on I went to plan the hands on training.
Visual Arts In-service Training
Session 1 – Play with purpose
Rational – Art teachers often do not have the time to “play
with purpose.” Rather the art they
create usually amounts to project examples for their students. During the pre-school week of teacher
in-service training and planning the workshops and meetings teachers have to
attend usually do not relate to the visual arts. Most meetings and trainings are geared toward
the core curriculum, technology, policy and procedures, or curriculum alignment. The art teachers are often assigned to a
course that does not relate to their field.
The purpose of this in-service
training during pre-service week is to give art teachers an opportunity to
experiment with media and allow them time to brain storm how they could apply
these experiments to the own art and the lessons they develop for their
students. These exercises are a direct
reflection of my summer studio course work at the University of Florida in July
of 2011.
The sessions consists of 8 art teachers
(3 elementary, 1 middle, 1 jr. high, 3 high school)
Session Outline
1. Wax Resist Watercolor Painting Memory Book
Supplies:
a.
1 8x12 piece of watercolor paper. (substitution:
white drawing paper)
b.
Single color, very diluted water color paint in
a jar
c.
Wax paper
d.
Tape
e.
Marking tool (Ball point pen)
Process:
f.
Fold
paper in ½ (Hamburger) then fold edges in to the half fold. Crease edges. Unfold paper then fold it in half again (hot
dog)
g.
Place wax paper (over watercolor paper with the
waxy side down)
h.
Tape papers to table
i.
Prompt – Think back over your summer and
visualize your favorite moment, place or activity.
j.
Draw the scene or the feeling it brings to mind
on the wax paper with water color paper underneath it. (fill the space)
k.
Cover the entire paper with watercolor. Allow to dry.
l.
Cut the centerfold but leave the two end
sections attached.
m.
Push together to form a book.
Applications
n.
As a warm up to water color painting
o.
A book for poems
p.
Intro to wax resist as in batik
2. Frottage – Printmaking by rubbing – Focus on Line and Color Mixing
Supplies
·
Red, Blue, Yellow Printing ink
·
Plexiglas for spreading ink
·
Brayers
·
Marking Tools
·
Papers (watercolor, or drawing)
·
Wax Paper
·
Newsprint
·
Music
·
Tape
·
Contact paper – or any other thin paper for
blocking ink
Process:
·
Roll out 9 inking stations (3 each color)
·
Place 1 piece of paper (gently) over each plate
of color (secure with tape)
·
Place wax paper and newsprint over the printing
paper.
·
Draw your response to the music heard. (1-2
minutes)
·
Gently peel back the paper
·
Re-ink the plate
·
Go to the next color (Place contact paper cut
outs on inked surface)
·
Place paper over plate
·
Draw your response to the music heard (1-2 min)
·
Repeat process with the third color
Applications / Variations
·
Color mixing – the areas resisted by the contact
paper preserve the original color. The
other areas blend.
·
Variation
– Rather than re-inking surface you could use the ghost of the ink as an
exploration of opacity/blending
3. Image Transfers
– Experimentation with transfer mediums
Supplies
·
Glue, Modge podge, Acrylic medium, Gesso
·
Packing Tape, Contact Paper, Transparency paper
·
Mat Board, Watercolor Paper, Drawing Paper
·
Water
·
Tracing Paper
Process 1:
·
Place packing tape or clear contact paper over
image
·
Soak in water 5-10 minutes
·
Use a gentile rubbing motion to remove the paper
backing from the image
Process 2:
·
Cover tracing paper (watercolor paper, or
drawing paper)with glue, mod podge,
gesso, or acrylic medium
·
Place images face down on paper
·
Burnish the back of paper image
·
Allow to dry
·
Use water and a gentile rubbing motion to remove
the paper from the back of the image.
·
Tracing paper should be stiff in the end
4. Experiments in Posative and Negative Space
Supplies
* Wet Erase Markers, Rubber Bands, Paper, pencilProcess
1. Drop a hand full of rubber bands on to the paper. Draw the negative space created by the overlapping bands and their shaddows.
2. Demo how to use the wet erase markers
3. trace the pencil lines drawn with the markers and use water to spread the color and add design.
4. The negative space now becomes the positive space.
Applications:
1. Exploring positive/negative space, line designs, abstraction,
2. Exploration in making something complex from something simple
3. Exploring the power of chance in the creation of art.
My Reflection: When it can go wrong it will. I got to school and realized that we had no yellow or red printing ink and there weren't enough wet erase markers for everyone. I left the contact paper at home, and all our brayers wouldn't roll. Ok. So time to improvise. I ended up mixing acrylic paint with gell medium so it would flow better and not dry so quick, and found some sponge brushes to spread the ink on the plexiglass. At one of the teacher's suggestion we tried out the crayola markers. Wow. They work just the same as the wet erase markers, and they're less expensive!
I decided to switch up the order of things and do the hands on session first and the lesson exchange in the second session. This worked great. After the opening session with all teachers the art teachers were ready to do something creative. I skipped the opening session to get the room set up for the art teachers and do some print samples. They weren't working the way I had hoped. The paint substitution was too think and I couldn't get an even print. This is one process I really need to work on before I attempt it again. With that in mind, I decided to do that process last. As it turned out we ran out of time in the first session so we started with that after lunch. While the teachers liked the process, the results weren't that great. The good thing about it was that we all began brain storming how we could use the process, alter the process, and make it relate to Va standards of learning at different grade levels. So maybe it actually was a success.
Everyone liked the wax resist memory drawing, and the idea that it could be made into a book for use in writing memories, poems, or for sketching. The rubber band activity was quite a conversation starter. How the activity could be used was explored by us all. I call that one a success. From there we went onto the image transfer techniques. I showed the examples from my sketchbook class, how to use the glue, modge podge, gell medium, tape and transparency. I skipped the gesso as only the high school teachers used it. I explained that we were experimenting with different media that did the same thing to explore how we each could utilize the concept on varying budgets. Through trial and error, everyone discovered how much of each transfer media was needed as well as how much rubbing would work and not take off the image too. Again, I call this exercise a success.
We ran out of time after the image transfers and had to break for lunch. Refreshed we came back for the printmaking. This was not as good of an outcome as I would have liked. Lesson learned: Make sure you have all the needed materials on hand before offering to do a project, and practice more before doing the demo. We spent more time that I had thought on this process so we had to rush through the lesson sharing. The success of that was in that we all found out what each other was doing so we did not duplicate at a different level, but built on each lesson in the following grades. Lesson Learned: Give a media or process topic for the lessons teachers are to bring. Such as, today would have been great if I had instructed everyone to bring a lesson they use for printmaking.
Monday, August 29, 2011
Not Just an Art Supply Catalogue
I’ve always loved to looked at art supply catalogues, but I never paid much attention to the little side notes. Nasco, Sax, Utrech, Dickblick all have web sites for ordering, but did you know they had lesson plans too? Until recently I didn’t know that. With a little exploring I found many lessons that I could adapt to my own curriculum and grade levels. While most of the lessons are simple and geared more toward the elementary classroom, they are great for brainstorming about my high school students.
Her are some of my favorites:
· http://www.dickblick.com/lesson-plans/discipline/sculpture/#3
· http://www.dickblick.com/lesson-plans/burlap-figures/
· http://www.enasco.com/pdfs/ac_lessons/volume54.pdf
Sunday, August 28, 2011
Seeds of Light
Continuing with the theme of identity, students will move from bas relief portraits to sculpture in the round. From objective and obvious, to symbolic. The next art work will build on the techniques of assemblage, but this time there will be more variety and options in their art creation. Life cycles in nature will be explored. How ideas come to life will be explored. Through "Seeds of Light" students will incorporate light into sculpture. I'm still working out all the terminology and lessons with in the unit, but I've got some samples in the making.


Project 1 continued and other thoughts
Well now in VA we've had major brush fires spreading smoke all the way from the coast to Powhatan. We've had earthquakes. We've just gone through a hurricane and its tornados. What a week! Two days now without power. No internet or TV means the family actually has to spend time together. Research was put on hold but more work was done on projects samples.


After cutting and glueing many layers according to my grid drawing of the value sectioned face I realized that more needed to be added to make the sculpture more complete.
Lessons learned:
- Students will use their basic grid drawing as the foundation for their sculpture creation, not as the only map of where to add levels of relief.
- This project will take longer than originally expected. If it takes me more than 4 hours for construction, it will take my students longer. The good thing is that now that I have gone through all the steps (other than painting it) in art work planing and construction I can make a more realistic time line for this particular unit of study.
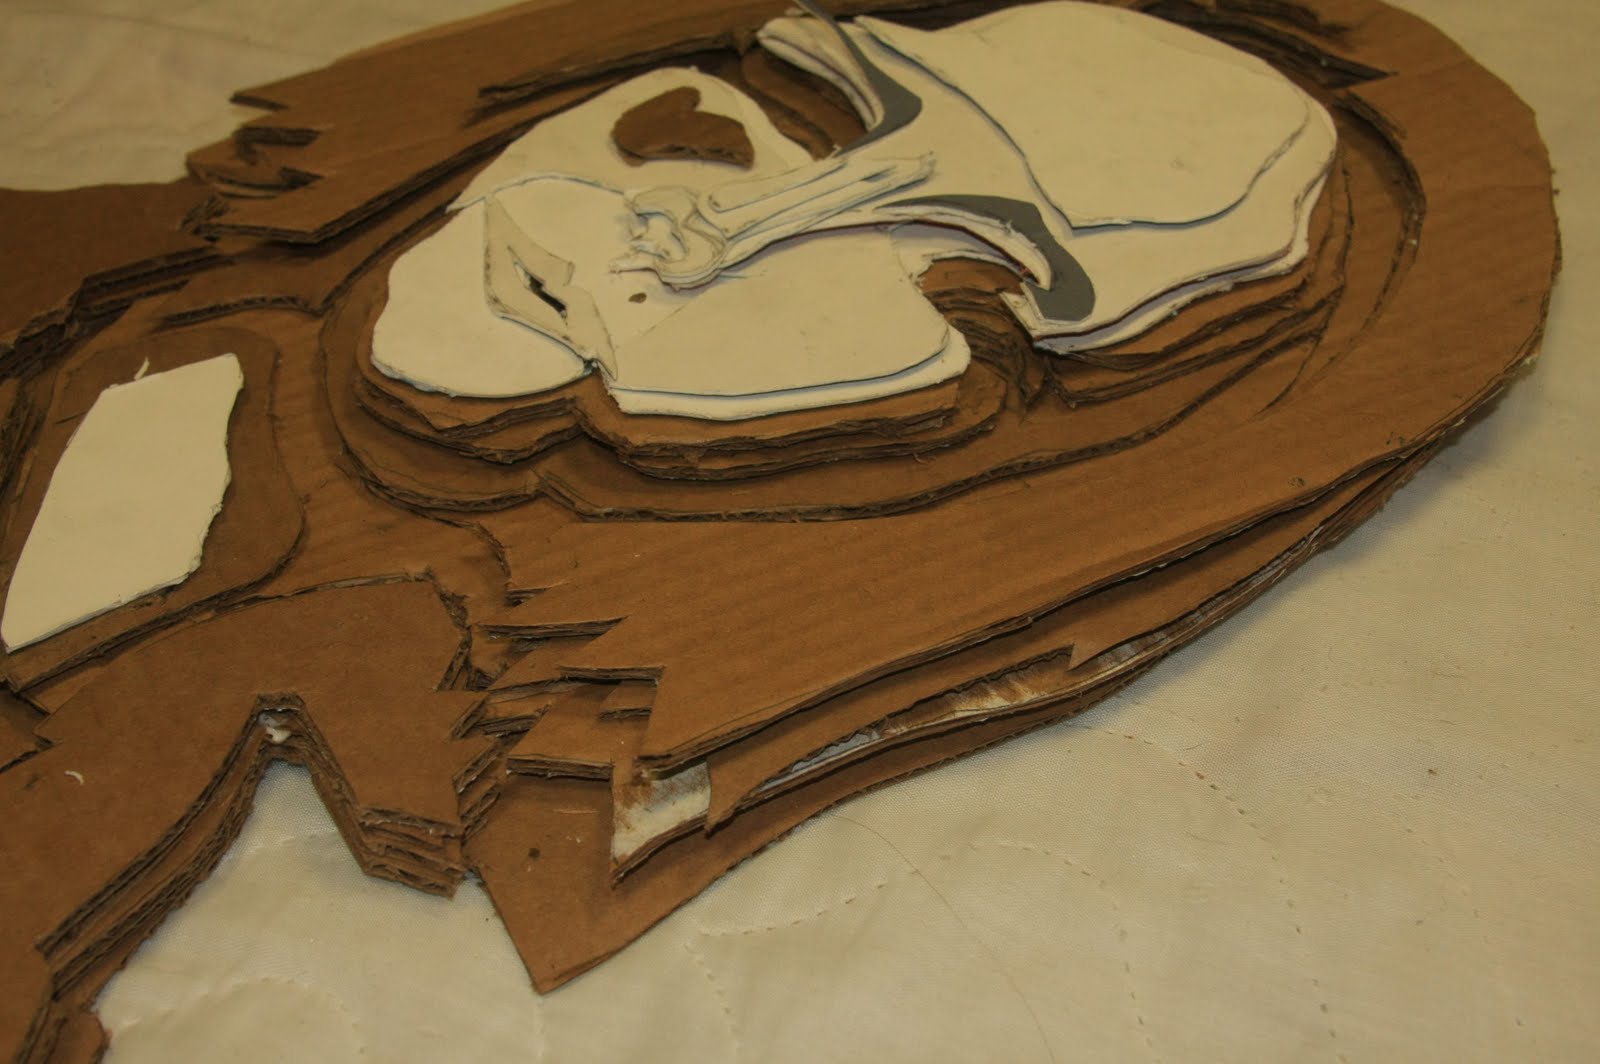 Multiple Layers build the face and hair.

 I used the large grid drawing as a template for cutting the cardboard that I stacked and glued to form the various levels of relief.
 Card board boxes are available from the cafeteria at school. Recycling at its best!
 Rubbing the back of the drawing works as a transfer medium so that the drawing can be transferred to cardboard for cutting.
Subscribe to:
Posts (Atom)